BLEED, TRIM, BORDERS AND DIE CUTTING
Do I need to include bleed with my artwork?
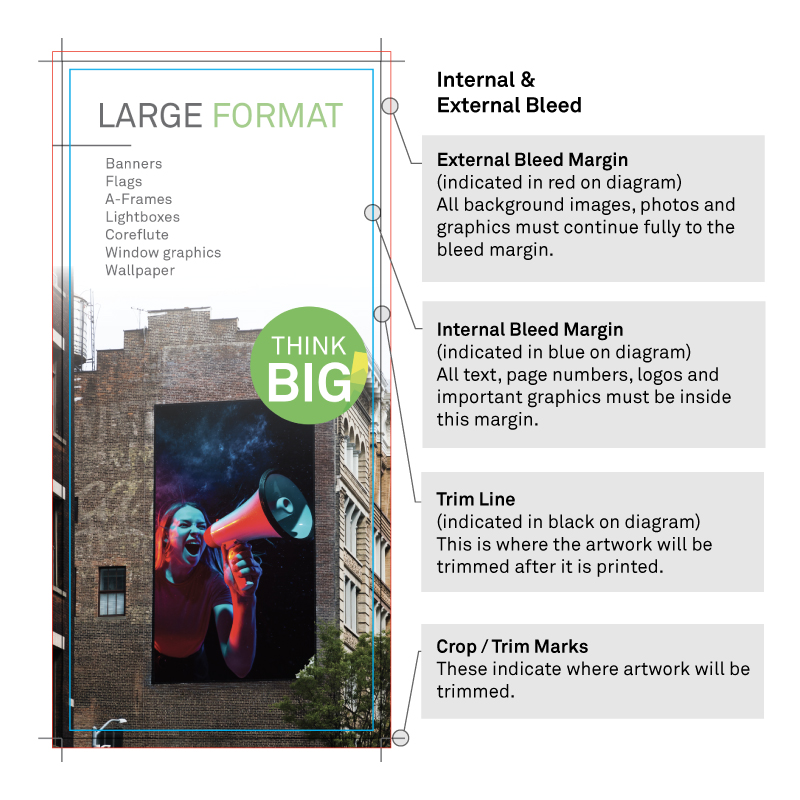
For borderless printing files must be set up with the correct internal and external bleed. The bleed requirements vary for individual products. We recommend 3mm for small format and 10mm for large format.
Internal bleed means all text and important graphics must be kept the minimum distance away from the trim edge to ensure these elements are not trimmed off.
External bleed is the area extending past the trim line which allows for a small amount of movement that may occur when your order is being cut to size. All elements which extend to the trim edge must also extend to the external bleed margin.

What are Trim Marks?
Trim marks are thin lines printed in the corners of a document to indicate where the paper should be trimmed after printing.
Do I need to I need to include trim marks in my supplied artwork?
No, you don’t have to provide trim marks on your supplied artwork as long as your artwork is correctly sized with correct bleed. You can include trim marks if you wish however please ensure that they are never flattened onto your artwork or placed in the incorrect position.
Setting Up Borders
Do you have borders (including partial borders or strips) in your artwork?
We recommend that all borders (including partial borders/strips) are at least 5mm in width and/or placed 5mm inside the trim edge. Borders can be made from strips of colour, solid elements, lines/strokes, text and other design elements.
Narrow borders, or borders placed too close to the edge of your design may result in uneven borders after printing/trimming.
Please note: We don’t recommend using borders on small products such and business cards and small stickers.
Our precision laser-cutting plot equipment will allow even the most intricate and detailed of cut paths to be completed with precision and accuracy. We have the the ability to cut, plot and score all with one state-of-the-art machine.
Setting up artwork for die cutting
If your art is being cut to shape a SPOT COLOUR DIELINE is required. Die lines can only be created in Adobe InDesign or Adobe Illustrator. If you don’t have either of these programs we offer an artwork design service which you can order when discussing your project with our sales team.
- Create your artwork file with the correct dimensions and ensure colour mode is CMYK
- Create your design
- Create a dieline around your artwork. The dieline should be a vector line/path on a layer in your design – no other elements should be on the layer, name the layer ‘Cut Layer’
- Make a new spot colour for the dieline (100% magenta is common, the on-screen colour doesn’t matter because dielines are never going to print anywhere except on a proof. Call the colour ‘CUT1’ and give all your dielines a 1pt. stroke, ensure there is no ‘fill’ and set the stroke to overprint in the Attributes palette:
• Adobe InDesign: Window > Output > Attributes
• Adobe Illustrator: Window > Attributes - If the job requires folding or scoring, you can indicate that with a dashed dieline, make a new spot colour called ‘Fold’ or ‘Score’ and add a new layer named ‘Fold’ or ‘Score Layer’
- Add a 10mm bleed beyond the dieline/trim edges; and for LARGE FORMAT printing, where the cutting is done by our computer driven flatbed cutter, add 20mm bleed
- If there is an inside cut such as a hole on a door hanger or a cutout for a plastic blister on retail packaging, create a new layer called ‘Inside Cut’ and outline the dieline using a new spot colour named ‘Inside Cut’
- Save or export your artwork as a ‘press quality’ PDF
It is important to make sure that your dielines are aligned perfectly over your original artwork underneath.


